Showing posts with label Board Games. Show all posts

Sunday, 24 February 2019

A Return to Squad Leader


One day a long, long, long time ago in a wee flat many miles away from Kingsleypark Manor, (Dundee's Hilltown to be exact) I should have been up to my ears with law books studying for my degree exams. But instead, I had been invited by Robert an on/off member of the Dundee University Wargames and Role Playing society to play a game that I had read about many times but had never yet seen in real life - "Squad Leader - The Game of Infantry Combat in WW2"

Robert brought out of his cupboard the orange and black box, with the sinister looking SS officer on the cover and on opening the box there were dozens of plastic baggies filled with 100's of counters, a fairly meaty looking rule book and 4 geomorphic hex boards.

One of the real innovations of Squad Leader was the "programmed instructions" layout of the rulebook. You only needed to read a certain number of rules to play the first scenario and once you were familiar with those you would read the next rules section in order to play the second scenario and so on. 

The base game was subsequently expanded with the release of the Cross of Iron, Crescendo of Doom and G.I. Anvil of Victory modules and as it happened Robert had all those modules too.
No, this is not a picture of the inside of Robert's cupboard but a picture of the Squad Leader shelf in the Cabin.

So we set to it and played through the first few scenarios and being the impatient gamers that we were, we were soon jumping through the scenarios introducing tanks, flame-throwers, cavalry and even a scenario where German motor-cycle side car riders were trying to capture the Dutch Royal Family (scenario 26 "Assault on a Queen" from the Crescendo of Doom module, if you are interested). Needless to say, I didn't get any studying done that day and so I was hooked and set about getting my own copies (which as you can see above, I managed to do).

Problem was, after finishing Uni the availability of opponents dried up and so for a few years the boxes stayed in the bottom of my cupboard. A move back to Brechin (my original home town) and I did get some games in against my bro but even those games stopped after a while so it must be over 25 years since I last played. 

G.I. Anvil of Victory was the last of the Squad Leader modules to be released. The fabled Pacific War supplement never appeared (although The Wargamer magazine (issue 30) did publish "Blood & Sand" which provided maps and scenarios for some Pacific Battles). Instead, Avalon Hill released "Up Front - The Squad Leader Card Game", a game that I had, played once and sold it and the Banzai expansion module a few years back for much gold. 

And then Avalon Hill released "Advanced Squad Leader". ASL, as it's known, effectively ended any further Squad Leader modules being released and has gone to become a hugely popular, game though with very detailed, micro managed rules. It is now a game series which according to Boardgamegeek now has 428 expansions! I have played a couple of scenarios from the ASL Starter Kit 1 but I found the whole thing too intimidating to invest in.

No. 2 son, Roo (not his birth name but that's what he likes to call himself) had been looking at my games shelf during the holidays last year and was making noises about trying some of those "hex and counter" games. We managed to get a game of Arnhem played (my very first hex and counter game as told about here (which lead me to buy another copy of the game for Roo to keep for himself) but between one thing and another we didn't get another hex and counter game played. Until last week.....

Having looked at the Squad Leader rule book and being unencumbered with rehearsals and the like, Roo announced that he would really like to give the game a go. So it was, that we set up the pieces for the first scenario - "The Guards Counterattack".

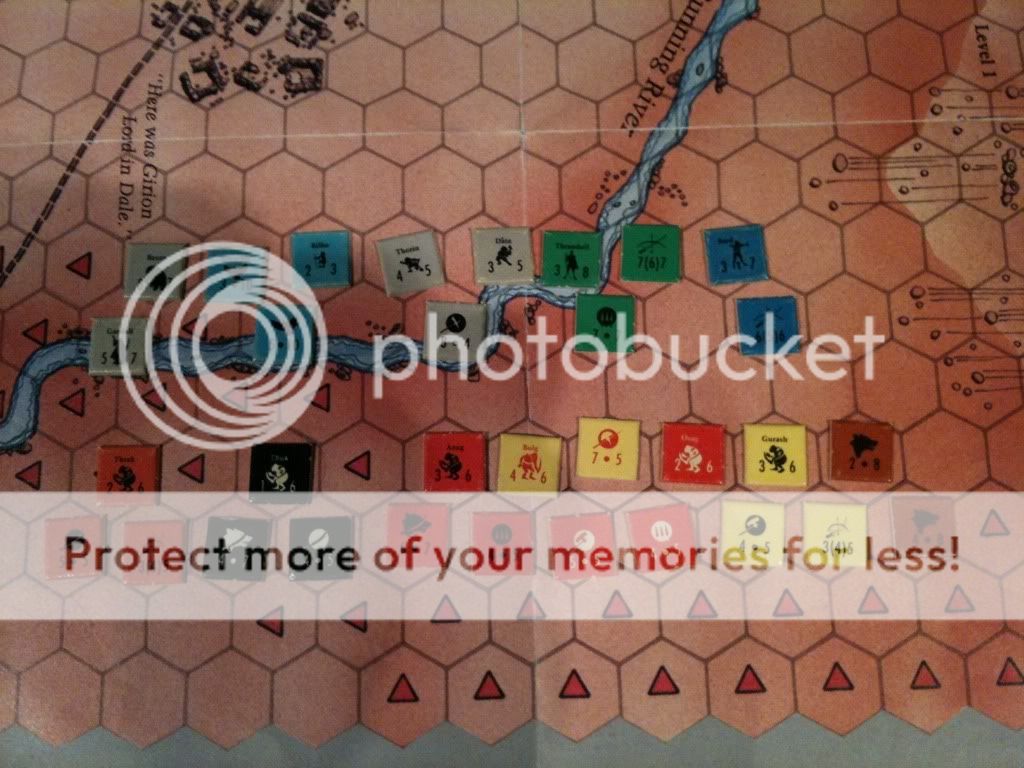
The objective of the scenario was for the Soviets (Roo) to capture 2 or more of the stone buildings initially occupied by the Germans (me) OR have a favourable 3:1 ratio of unbroken squads at the end of the scenario, which was to last 5 turns.

Roo wasted no time in opening fire with the 3 stacks of squads situated in the building in the top left corner of the board -
Ouch!

Whilst primarily an "IGO-UGO" system there is opportunity for defensive fire to take place during the opponent's turn. It is also pretty devastating being caught out in the open so when Roo attempted to move Colonel Berki and his 3 squads into hex E5 with the intention of forcing the Germans to retreat out of that building he hadn't realised he was in the line of fire of the German stack located in the large stone building in the middle of the board and with admittedly a very good roll on my part, the inevitable happened -
The late Colonel Berki 

The German turn saw the broken squads rally and in their "Prep Fire" phase cause more casualties to the Soviets so that at the end of the first turn the board looked like this -
The red counter are Soviet Squads which have gone "Berserk" as a result of rolling a "2" when testing morale. This means that they ignore all further morale checks but have to move towards the nearest enemy unit to engage them in close combat.

The casualty count at the start of turn 2

The Soviets pushed on to try and take the German held building on the left hand side of the board. Moving in to an adjacent hex to enemy units is always risky even with the benefit of cover but it didn't help the German cause when this happened -
The dreaded "box cars" result meaning that the 2 light machine guns in Sergeant Kelso's stack suffered a breakdown - not helpful when facing a possible close combat

Scene at the end of Turn 2 -

Turn 3 saw the Soviets assault Sergeant Kelso's hex but the combat was inconclusive and saw the two sides locked in combat. In the defensive fire phase the Germans saw matters swing to their advantage when the 2 stacks in the bottom right of the board opened fire on the Soviet squads in the building before them -
"Snake Eyes!" A welcome sight when you are the firing player.

The close combat in Sergeant Kelso's hex saw the 2 sides annihilating each other (close combat is very bloody if the rolls come off) so at the end of turn 3 the board looked like this -
Sergeant Kelso has fallen but now the Germans have advanced and are occupying one of the Soviet buildings, not good news for the Soviets!

The Casualty tally at the end of German turn 3

As the name of the game implies, Squad Leaders are key. If a squad breaks as a result of a failed morale check then only a Squad Leader can bring them back. At the start of turn 4, the Soviets only had one squad leader left and with a number of broken squads on the board, Roo felt he had to get that leader, Lieutenant Dubovich, to help those squads but again having to move into the open had predictable results and Lieutenant Dubovich, fell in a hail of bullets. With no way of bringing their broken squads back, victory was slipping away from the Soviets.

End of German Turn 4. The Soviets are running out of unbroken squads although they did have some success in capturing a German Heavy Machine Gun.

Casualty list at the start of Turn 5

With no hope of being able to achieve the victory condition, Roo took some comfort in trying to inflict some more casualties on the Germans and another German squad was KIA'd but it was too little, too late.

The board at the end of the game.

The casualty list.

Combat in Squad Leader can be extremely brutal. Cover is key and you have to protect your squad leaders otherwise your force will be eroded away too quickly as your squads fail their morale tests and can't recover. That may be one of the weaknesses of the game in that so much depends on the squad leader. I don't know if the rules in the later modules do anything about that - we'll have to keep playing to find out!!


Friday, 22 May 2015

World of Warcraft: The Adventure Game - A review


So the exam is done (man it was hard going) and the show is out of the way too, "Up Pompeii" for those of you who are interested (was that a tumbleweed moment there???) Anyway here is a picture for the one of you interested

I can see the number of hits from the p0rn sites shooting through the roof now.

Anyway moving swiftly on, now that all that stuff was out of the way it was time to get some gaming done. Ruarok and Cammie are still at Uni, Kev is busy training to get his brains bashed in a Charity Boxing match and with the cricket season in full swing, Gary couldn't manage so it meant that only Stevo and Neil could manage along to the Kingsleypark Cabin and Neil was on standby as his wife is due to go into labour at any moment with their fourth child (he really must start putting the heating on during the winter months).

So the question was what to do when there were only 3 of us. Time to scour the shelves of the Cabin and out popped this -


Like many millions of others I have played World of Warcraft Online. It was many, many years ago now and I never became a subscriber, just played the free trial and created, I think, a Dwarf character and wandered about Azeroth for a while. However, I wasn't prepared to make the time commitment to really go anywhere with it and after logging in one day and finding the Dwarf had been ambushed and all my gear stolen during a raid, I'd had enough (no I didn't go in a huff, I just had other things to do with my time alright?).

So although I wasn't a hardcore fan, I still found myself picking up World of Warcraft - The Board Game (and all of it's expansions) and it's little brother, World Of Warcraft - The Adventure Game (and all of it's expansions) when they were released by Fantasy Flight Games.

The Adventure Game and The Board Game side by side


Now as the ladies will tell you, size doesn't matter but the problem with World of Warcraft - The Board Game (I think I'll call this "WOW TBG" hereafter) was that it was huge. The base set was packed with stuff and the expansions added hundreds of more bits and an additional board. It took forever to set up and even longer to get a game played so no surprise to hear that I've only played it 2 or 3 times and it seemed to be incredibly biased towards the Horde characters (the Orc Warrior in particular), or did it just seem that way because I lost every game as an Alliance player?

Anyway when World of Warcraft - The Adventure Game (I'll shorten this to "WOW TAG") was announced it sounded like it might be WOW TBG lite and thus a much quicker set up time and play through. So it was duly purchased.

And yes, there are fewer bits and according to the blurb on the box a 1 1/2 - 2 hour game, but it soon became apparent that this was a totally different game and still involved a big time investment in set up and play through.

The game board all set up and ready to play

The base set comes with 4 characters (2 Alliance and 2 Horde characters who had all appeared in WOW TBG), nicely detailed  soft plastic figures (and no I haven't tried painting them) with each character having a unique deck of ability cards which can be used throughout the game to assist in movement, healing, combat and so on. The characters also come with 4 "level" cards, the idea being that you start at the lowest level (the grey card) and go up in level by completing certain encounters until they reach the highest level (the red card)


The level cards are double sided with a "starting side"  and an "improved side" 

The "improved side" contains a special power that the character can use at the appropriate time, in Brego's case "combustion" which allows him to treat a 5 on the combat dice as a 6 (and at higher levels , a 4 and 5 can be converted to a 6 and as you may have guessed, higher numbers are better).

Each character card had a combat value (either a ranged attack - the bow symbol shown on Brego's card or a melee attack - crossed swords symbol) a character will either have a ranged attack or a melee attack - not both, although some items and abilities might allow a character to do both, defense value (the armour symbol) and damage inflicted (the axe symbol) and the number of health points (the figure in the top left corner) that the character can suffer before it is "defeated" - characters in the game don't die as such.

The level cards also display a number of icons which depict the types of item that the character can use so in Brego's case, being a sort of Hunter type of guy, he is restricted to light armour etc.

The object of the game is to accrue 8 "valour" points. These points are earned by completing quests and/ or by defeating the big baddie "Overlords".
Brego's starting quests

2 quest decks are provided - one set of starting quests and an "elite" set of quests. Certainly there are enough cards in these decks to ensure that you will see different quests being attempted each time you play.

So once the player picks his character, collects his level cards and ability card deck,  backpack and log book tokens and their 9 character tokens (used to mark locations you are trying to reach etc) they place the figure representing their character in one of the 3 City spaces on the board (if you are trying to complete a location quest, you'd probably want to start in a City nearest to that location - other quests may require you to kill certain beasties, or cause damage to other players) deal yourself 3 cards from your ability card deck to form your starting hand ( you can never have more than 10 ability cards in your hand) and then the game can begin.

There are 4 phases to a player turn - movement, exploration, challenge and maintenance.

Ironforge City

The various locations on the board are connected by various pathways along which the characters can travel to get to their desired location. In certain locations it is possible for a character to fly across the board thus speeding  up their progress. The character's movement is determined by the roll of a special dice -
The blue movement dice flanked by the red and black combat dice

It seems, reading the posts on the forums at Boardgamegeek that the movement dice comes in for a lot of hate. 

The 6 sided dice has numbers ranging from 1 to 4 which is the number of spaces that the character can move that turn and each face also contains a number of symbols representing the amount of energy available to the character for the turn. Energy is key for allowing the character's ability cards to be cast, or in some cases to allow the character to flip his level card from it's starting side to it's improved side. People criticise the dice for being too random and at critical times not giving the character enough movement/ energy when they need it and a number of alternative methods have been suggested to reduce this randomness. But I don't mind using the dice. To me, it represents the possibility of the character getting lost (if he rolls a 1, for example) and hasn't made as good progress as he would like that turn, or if his energy for the turn is low it may be as a result of him not eating his Weetabix that morning.

The character can move as few or as many spaces as allowed by the die result. He can even stay where is (sometimes that's obligatory - see later) but you would still roll the dice in order to determine how much energy he will have that turn. Also, the character can only access spaces that are the same colour as his level or less, so a green level character can only access green or grey spaces, not yellow or red spaces. 

Again this is another aspect of the game that some people on BGG don't like and are off the view that you should be allowed to go anywhere on the board without restriction. I haven't tried playing that way so far. Certainly it can be a pain if your starting quests require you to get to a red location  but quests can be abandoned and new ones drawn, so I'm still of the view that this restriction as per the written rules is not a game breaker.

When the character ceases movement in a space, that space will contain one or more of the following symbols (the exploration phase)
The symbols tell it all.

If there is not a Discovery Token in the space then the character can choose one of the icons to activate. If there is a Discovery Token present then this must be revealed instead of activating an icon. These tokens can range in effect with some being boons (gold, extra movement etc) or curses (disease, bomb, ambush and so on).

Once the Token or icon has been resolved, then if there is no other player character in the space the space must be encountered by drawing a card from the appropriate coloured deck. If another character is present then you can choose to encounter him instead but you don't do both (the challenge phase).

The encounter cards are double sided so the card must be drawn from the bottom of the deck. There are 2 types of encounter - a creature or an event (the latter being either a location, special or global event).


If an event card is drawn then you follow the text on the front of the card which may then involve you flipping over the card once you had achieved the stated objective, but you would keep on drawing more event cards until eventually you draw an encounter card and fight the beastie that has been drawn. Again the creatures have a combat value, defense value and damage value.

Combat is pretty straightforward and is the same for fighting beasties or other characters - if you have a ranged combat value then you get to strike first and you can use energy to cast ability cards that may help boost your combat value, you roll the red D6, add the score to your combat value as modified by any ability cards and/ or weapons and if you equal or exceed the opponent's defence value you hit and you do damage according your damage value (again as modified by any ability cards played or weapon used). If both combatants have a ranged combat value then combat is simultaneous, if only one has a ranged combat value and fails to defeat his opponent with that attack then the opponent will get to strike back with his melee combat value. If both have melee combat values then again the combat is simultaneous.

Some weapons/ items or abilities have special powers if a particular result on the attack dice comes up.

The beasties all have one damage point so they are defeated straight away if their defence value is matched/ exceeded. If the beastie wasn't defeated then they would stay on the board until they were eventually defeated. To stop the board getting too cluttered up with cards these beasties are marked with a counter on the relevant space and the card then placed in the encounter track on the edge of the board.

Some of the beasties have the aggro trait which mean that the character can't move out of that space until the beastie is defeated.

If a character takes cumulative damage to equal or exceed his health points then they are "defeated" which basically means that they lose any abilities that were attached to their player card, get "resurrected" in the nearest city and start their next turn from there. 

If the character is defeated by another character then the victor gets to steal one of the loser's items contained in their backpack but otherwise the loser does not lose any other equipment. A pretty lame result in my view, I would have thought there should be a harsher consequence for being "defeated" although I suppose it prevents the possibility of a player falling too far behind but that is one aspect of the game that I feel could be beefed up.

If a beastie is defeated then the card is flipped over to reveal an item which the player can then keep and use, provided it is not of a type that can't be used by the character.

There are loads of different items that can be picked up and as you would expect not all of them can be used by a character. Although your backpack has unlimited capacity for you to keep unusable items in, these items can still be put to good use. Each item will have a potion icon(s) printed on it -  health, energy or movement - and these items can be exchanged in return for getting one point of health, energy or movement. So if you are trying to move round the board quicker but you keep rolling that "1" then you can use movement potions to speed up your progress. And any number of items can be discarded in a player's turn to get those bonuses.

After combat you then go into the maintenance phase whereby your character can equip/ unequip items and fulfill any quest conditions. If they have defeated an encounter that allows them to go up a level then they take their character's next level card and put that into play, restore their health points and draw 3 more ability cards,  then the turn passes to the next player and so on until one player character eventually obtains the required 8 valour points and wins the game.

Simple!

Well yes and no. Given that it was my first game for many a long while and neither Stevo or Neil had ever played it, it took a while to get into the rhythm of the game and some of the cards took time to read and understand what was required - there is a lot of small text on some of these cards!!! 

Our respective starting quests varied in difficulty, with Neil getting some particularly hard quests to try and complete. Also Neil's character - "Sofeea Icecall" seemed to have an ability, which although handy in avoiding attacks by other players seemed to render some of the improved abilities on his ability cards defunct.
Sofeea Icecall, unsure of what to do next

Stevo was playing "Wennu Bloodsinger" and despite carrying about a pretty useless weapon found himself with 6 valour points and looking good to getting the final 2 points he needed for the win.
Weenu Bloodsinger trying to flap a Murloc Streamrunner into submission

We had randomly picked our characters so I ended up pulling a little gnome (I think - do they have gnomes in WOW?) guy called "Brego Bigshot"
Brego away to give a Bigshot to a Daggerspine Naga Shorehunter (they do like their long names don't they!).

The board starting to fill up with undefeated encounters and event cards


For ages, Sofeea and Brego were stuck on 3 valour points each and were lagging behind the sleekit Weenu. Suddenly, however, I managed to complete a quest which gave me 3 valour points and then pulled a quest which gave me 2 valour points for defeating 3 undead creatures and lo and behold there were 3 undead beasties all within close proximity of each other. So although Stevo made a vainglorious effort to grab his last 2 valour points and Neil suddenly completing his quests which put him on 7 points, a few Bigshots from Brego saw him triumphantly claim the win.

However, it had taken 4 hours......... (and that didn't include set up time, as I had set the game up before the boys arrived).

As I said earlier, some of this was down to us not being up to speed with the game rules and having to spend time reading the various cards in order to be sure what they meant - mind you Stevo seemed to spend every turn checking the ability cards in his hand, even where he hadn't drawn any new ones. And we did lose some time tucking into the Dominos Pizza that the guys had brought with them (yes Dominos has reached Arbroath), but it was a bit of along haul.

I'm sure though if we play again we will be able to speed things up and I certainly think given the number of different characters, quests and encounters available, no 2 games will be alike so I would be keen to give it another try.  

Certainly the forums on BGG have a number of suggestions for speeding up the game, varying the movement rules and also a variant for solo play so I will look at these and give them a try

The 12 available characters perched bravely on top of their level cards and ability card decks

The bad news for any of you that might be tempted in giving the game a try is that it has been out of print for many many moons and it seems unlikely that Fantasy Flight will do another print of the game.

And no I'm not selling my copy any time soon.

Next up Ruarok and I head South to the UK Games Expo in Birmingham so if you are going to be there, give us a shout and let's get some gaming done!


Thursday, 28 April 2011

"The Treasure is 6 squares ahead and 3 to the left but watch out for the......"

 
I suspect, like many role-players, I started with Dungeons & Dragons, or to be more precise "Advanced Dungeons & Dragons".


I preferred to be the Dungeon Master rather than a player, call it meglomania, power hungry, control freak whatever, I don't know why, but I got more of a kick from the game by setting the scene than playing it.

But, it was hard work and trying to come up with interesting and different scenarios to challenge the players. Yes, of course, there were the Dungeon Modules that TSR (and other companies) released  and I certainly used them, but more as framework to help set the story rather than follow the module slavishly. 


Do you remember this one Dear Reader?

Alas, the guys that I played AD&D with at home all moved away due to Uni, etc and to be honest the role-players that started to take over the Dundee University Wargames and Roleplaying club in my latter years at Uni, weren't really interested in AD&D - they liked to play Cthulhu or Paranoia or Rolemaster and other weird systems which really didn't float my roleplaying boat, so my roleplaying days dried up.

Then in 1989, Milton Bradley games released Heroquest, a boardgame which used figures produced by Games Workshop, who then issued their own version of the game Advanced Heroquest


However, I did not rush out and buy the games (I picked these copies up many many years later) so didn't pay much attention to them although my brother did pick up a copy of Heroquest, we had a couple of games, it was okay but didn't really get the excitement going.

But then in 1995, my bro picked up another boardgame, again produced by GW - Warhammer Quest.


This was the business. The use of tiles, meant you could create different dungeon layouts each time you played. You could play a one off adventure or with the Roleplay book that came with the set you could have a "proper" roleplaying campaign running. Cracking game - really enjoyed it. It provided a different play experience each time.  


So of course, not wanting my bro to get one up on me I had to go and buy a copy for myself. That was in 1995. I eventually used my set for a game last year........

Not that I would ever admit this to Mrs Kingsleypark, but I do sometimes wonder why I rush out and buy things, only for them to sit unused for such a long time (sometimes never used- "Advanced Third Reich" anyone?). I know Gamers suffer from the "Ooh it's shiny!" effect , but why to we get it so badly? Any psychological insights into that condition Dear Reader?

Anyway here are the 4 heroes from the WQ set, which eventually saw some Dungeon Action last year after so many years hiding in their box.


Cotton The Barbarian


Goodgriff the Wizard


Flegulas the Elf

Borgrim Rockhammer, son of Grimborg Rockhammer, Laird of the Seven Hills of Karaz-Kapstan
(well you didn't think I would give a Dwarf a frivilous name like the other 3 did you??).

Monday, 28 March 2011

The Battle of Five Armies

Well now that we know that filming has started in Peter Jackson's The Hobbit attention will no doubt turn to all things Hobbit related. GW have been confirmed as having their Lord of the Rings licence extended by the Tolkien Estate so no doubt lots of lovely models will be coming out to tie in with the release of the films (we know it's going to be in 2 parts).

Of course Dear Reader, you may already be aware of the set released by GW sometime ago The Battle of Five Armies which I understand is based on the Warmaster system and uses 10mm figures. I have not played it but GordonY and Ruarok have had a couple of games
But these ramblings are not about that, but about a Board Game.


The Battle of Five Armies (or BoFA for short)was released by a company called Iron Crown Enterprises (ICE) back in 1984. ICE had the licence from the Tolkien Estate to produce board games based on the Tolkien novels as well as the highly acclaimed Middle Earth Role Playing system (MERP). I never got into MERP, despite it's obvious appeal but BoFA became a big favourite very quickly.

BoFA recreates the climactic battle that takes place at the end of the Hobbit. The battle itself only commands 5 pages of the novel but enough detail was given by Tolkien for ICE to make a stab at producing a game.


The map depicting the northwest and northeastern spurs of the Lonely Mountain, the plain around Dale and the Running River.


The protagonists - Along the top you have the Forces of the Free Peoples, which include Gandalf, Beorn, Gwaihir, Lord of the Eagles, Eagles, Bilbo, Dain II, Dwarves, Thorin, Thranduil, Elvish Spear, Elvish Archers, Bard and Men of Esgaroth.

Below them are ranked the Forces of Evil, which included 5 Goblin tribes, belonging to Thrak and Thuk (for some reason his name was never used by us when playing the game - instead a similar sounding word was used....), Osag, Gurash the Great, Azug the Vast and the Goblin King, Bolg, along with a horde of Wargs and Wolves.

The counters were easy to read and understand, the left hand figure being the unit (or characters) combat value and the right hand figure was it's movement allowance. Archer units had an additional figure which was their Bow Factor, which determined their range and strength, so if a unit had a Bow factor of 6 then at range 6 it's strength was 1, range 5 it's strength was 2 and so on until at range 1 it's strength was 6.

Most counters were double sided as an adverse Combat result would result in a step loss and the unit would be flipped over on to it's reverse side which had reduced strength (usually half the original strength of the unit) so normally a unit losing 2 steps would be elimnated. Characters were treated slightly differently in that their strength was equivalent to the number of step losses they could take and little chits would help keep track of these.

The key to winning the game was the control of victory areas. These were Dale, the Front Gate, the Hillock and the 2 Guardrooms, 1 on each spur of the mountain. At the end of the game, the player with control of the majority of areas won the game - Dale and the Hillock were treated slightly differently from the other areas which were only 1 hex in size, in that as Dale and the Hillock were several hexes in size, a player was deemed to control these areas if the strength of his units occupying these areas was more then double the enemy player.

The unique aspect about BoFA for it's time was that it although it was an IGO-UGO game, you did not have complete freedom to decide what your units did during your turn. Instead you had to pick an action chit


But of course, it wasn't quite as simple as that. The player going first that turn (the Evil Player going first in all odd numbered turns and the Free Peoples player going first in all even numbered turns) has free choice of which chit to pick as his first action of that turn, from either MOVE, FIRE, COMBAT or F/C (FIRE OR COMBAT). The other player would then pick a chit that he would use later in the turn, with the proviso that it could not be played immediately after the First Player's first Chit pick. After that, the Chits were picked randomly, until all of the available Chits for that turn had been played. In turns 1-3 there were 6 chits in the Chit pool and a maximum of 4 Chits could be played and on turns 4-12 there would be 8 chits in the pool with a maximum of 6 Chits being played. So as an example, on Turn 3, if the Evil Player picked a MOVE chit as his first action (and say the Free Peoples player picked a COMBAT Chit for use later in the turn), the Evil Player would move all, some or none of his units, then the Free Peoples player, as their first action of the turn, would have to randomly pick a chit from the Chit pool. The Evil Player, would then randomly pick a chit from the pool and then the Free Peoples player having the right to play the 4th and last Chit for that turn could either play the Chit he selected at the start of the turn or he could randomly pick a Chit from the pool.

So immediately, you were forced into thinking ahead of what you would want to do (but may not be able to do, if you didn't pick the right Chit). It meant you would have to plan your moves and then hope, for example, that the other player would not pull a move Chit on his turn and move away from all your units - as there are no "Zones of Control" units can move away from an Enemy Unit without penalty. However, as Combat was mandatory,  if the enemy player, in his turn, had to play a Combat chit, then your careful planning could hopefully pay off, if the enemy player then had to attack at an unfavourable combat differential.

Many a time a player would curse the pick of the FIRE chit when  he had no Archer units left to use it with! Also as each player, on certain turns of the game, could expect reinforcements, it was usually  good idea to make sure you had a move chit for that turn so that the reinforcements would actually get on the map!

There were 2 types of Combat - there was Assault where you totalled up all the Strength Factors of the opposing units adjacent to each other and the phasing player then rolled a D10 and depending on the differential between the 2 totals, the cross referenced score on the Combat table would result either in no effect, step loss(es) for the defender, step loss(es) for the attacker, or sometimes step loss(es) for them both. The type of units involved could result in modifiers to the die total, for example, a Spear unit assaulting a non-Spear unit would get plus 1 to the die roll.

Then there was melee - this was when a unit moved into the same hex as an enemy unit. The unit deemed to be the attacker that phase could call on the support of one other unit in an adjacent hex and the result was again worked out in the same fashion as an Assault, with again some units (namely non Spear/ bow Goblin units and also Beorn) getting modifiers to the die roll when they instigated a melee.

The rules were split into basic rules and standard rules but to be honest we never bothered with the basic rules and just plunged into the standard rules. This brought added flavour to the basic rules, so for example, at the start of each turn, the player due to go first that turn had the opportunity to try and recover step losses for those units which had been flipped over to its reduced strength side. Morale checks would require to be taken if a unit wanted to melee an enemy unit on a higher elevation - Goblins if they wanted to melee an Elvish unit and so on.

In Combat, Eagles could make swooping attacks which involved the Free Peoples player picking up the counter of the unit being attacked by the Eagle, flip it up into the air and if it landed on it's reduced side, the unit suffered a step loss. Needless to say some of us were a bit more enthusiastic about flipping the counter into the air than others.

Rolling rock attacks could be made at certain points on the map, if an enemy unit was deemed to be in the path of a rolling rock then it could suffer a step loss.

And in the Standard game, Gandalf, got some spells to use - there were 3 to choose from and he could use a maximum of 2 which was a real pain and there were always plenty of times you could do with Gandalf firing off a spell but you had to hang on to it as you were hoping for a better opportunity to use it arising later on in the game.

Then there were optional rules you could use in the game. One that became a default rule was that the Evil Player could use "Bat Attacks" during a Fire Chit phase. It could only be used against units that were already half strength but could be extremely annoying if the Evil Player was rolling hot on his dice (1-3 on the D10). Another commonly used optional rule was to let Goblins stack with Wolf Counters thus effectively making them Warg Riders (some of the tribes had Warg Riders already in the counter mix).

I have played the game many times over the years (although sadly not recently- Note to Cammie/ Ruarok we must start playing more board games  you can play this one with 3 players, at a push) and they were always tightly contested affairs. The Evil Player starts with a large numerical advantage, which gets even bigger when the 2 Goblin tribe reinforcements arrive on Turn 4 and Bolg arrives on Turn 5. Dale is usually captured fairly easily and then there is a push on to the Hillock. A fierce battle usually rages around the Guardroom on the Northeastern spur on the mountain, usually occupied by Dain and his Dwarves, being the one closest to the Evil Player's starting position. The Free Peoples player is quite often faced with a dilemma of whether to move the Elvish forces down off their spur of the Mountain, to try and contest the Hillock and Dale itself, while at the same time being aware of the possibility of another Goblin tribe coming over the top of the spur and thus looking to capture the Guardroom on that side of the Mountain.

The Front Gate is an extremely tough nut for the Evil Player to capture, particulary while Thorin and his Companions occupy the hex, but, and again using an optional rule which became the norm in our games, if Thorin leaves the Front Gate this gives all Free Peoples attacks on the following turn a positive column shift to the Combat Table, so the timing of this can be key and if badly judged could give the Evil Player the chance to sneak into the Front Gate hex.

Quite often, the game will be decided on the last turn of the game as each player tries to flood Dale and the Hillock with their units to gain the strength advantage required to claim it as theirs. I have seen the Dwarves die to the last Dwarf, as they battle to hold the Guardhouse and I have seen Beorn rush into the battle and not be able to punch his way out of a paper bag. Gandalf casting his "move away" spell and forcing a pile of Goblin counters to recoil into the Running River (as Goblins are adverse to water this immediately drowns them). And Thorin charging out of the Front Gate, only to forget to go back in again, thus allowing a Goblin unit to sneak in and keep Thorin out of the area for the rest of the game.

An excellent game, and although long out of print it still appears from time to time on Ebay. But perhaps with the new film, another games company (ICE having gone out of business a long time ago) might take up the mantle and re-print it, or perhaps bring out their own version of the Battle, in which case I would definitely be interested in getting it to see if it is half as good as BoFA.