Showing posts with label Figure Reviews and Comments. Show all posts

Friday, 30 March 2012

Favourite Unit of Mine - No.11

READER HEALTH WARNING!!! - Although I did paint some of the ickle models that you will see in this post I cannot take any credit for the big ones!!

I have been a Tolkien fanboy for a long, long time and I was so pleased with the way the Peter Jackson films turned out, although it's quite scary to think it's now more than 10 years since "The Fellowship of the Ring" was released.

I have also been a fan of the range of models that Games Workshop have released over the years and their rule sets - "The Lord of the Rings - The Strategy Battle Game" ("SBG") and "The War of the Ring" ("WotR").

In the film, "The Return of the King" there is that fantastic moment when during the Battle of the Pelennor Fields, the Haradrim forces of Sauron, arrive on the battlefield and launch themselves into the attack against Theoden's Rohirrim.


The Trolls are mean, the Nazgul are scary, the Balrog makes you want to run for your life but for my money they all get eclipsed by


The Mighty Mumak!

For quite sometime, the Mumak was the biggest plastic kit that GW produced. I'm not sure if that still applies given the recent big monster releases they have been putting out for Warhammer but still the Mumak is one cracking model.

As you would expect, in both rules sets the Mumak is an incredibly tough beastie. In SBG, he starts off with a basic cost of 275 points but if you kit the Mumak with all his optional extras he weighs in at a massive 445 points. As most SBG games use a force total of about 750 points you can't afford too many Mumakil in your army.

He causes terror (not surprisingly) to all it's enemies, is immune to most types of control spells, can trample it's foes into a pulp and pretty well ignores morale tests. Okay, it has the downside of possibly causing a stampede if it suffers a wound and trample through everything and everyone in it's path if it does goes wild but the Servants of Sauron are plentiful so hey ho The Lidless Eye can afford to lose a few hundred or so every time.

In the original, but now out of print source book - "The Return of the King" for SBG, there is a scenario called "The Charge of the Mumakil". Fortunately GW had the sense to include the scenario in the recently released "The Fallen Realms" source book. That scenario, however, calls for the Evil player to have 2 Mumakil. So.....
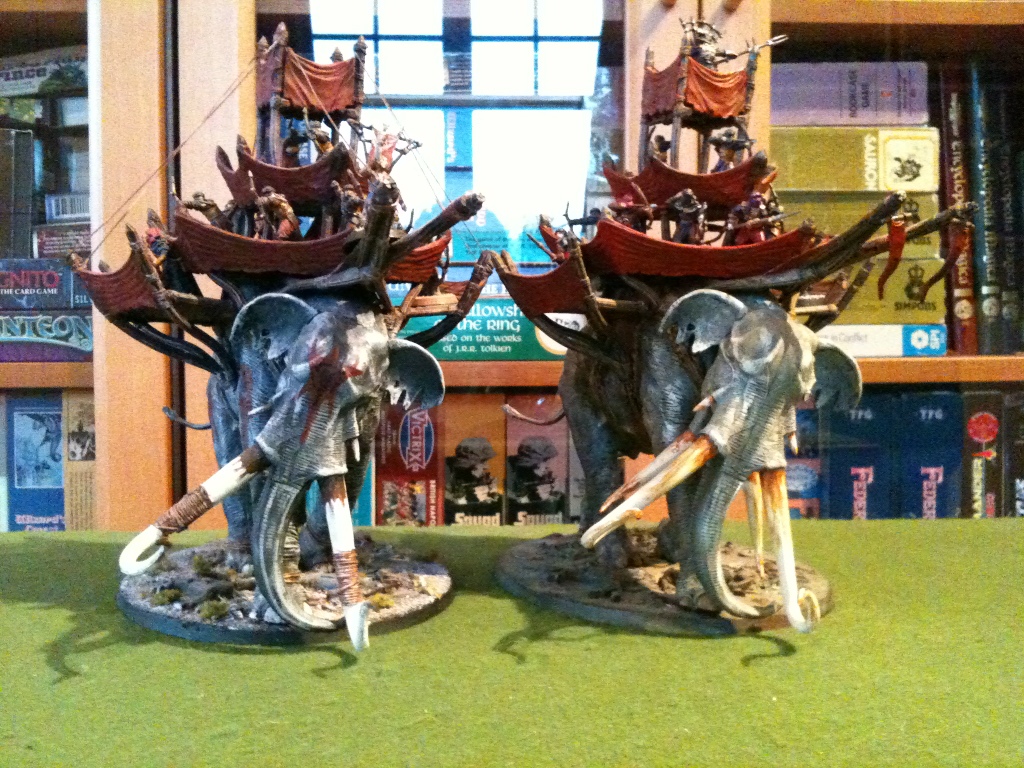

Double Trouble.

DaveT of the "Wee Men Under the Bed" blog and I played this scenario at Kirriemuir Wargames Club many, many moons ago, using the old sourcebook.

I didn't tell Dave in advance which scenario was playing, only that he had a shed load of Rohirrim Cavalry to deploy at the start of the scenario to which I deployed in response a thin line of Mordor Orcs. I told him, that I was entitled to have reinforcements turn up if I still had models in play after 3 turns, so like the true impetuous warrior he is Dave rushed the Rohan nags across the table killing the feeble Orcs, but not enough in time  to prevent the reinforcements arriving. 

Dave's face was a picture when I produced not one, but two of the beasties and proceeded to trample the horse warriors into oblivion. Final score Mumakil 42 - Rohan 0.

In WotR, the Mumak weighs in at 250 points and when it suffers a wound it uses the aptly named "Ridiculously Hard to Kill" Table. Again, it has the fun ability of trampling everything in it's way and some but also if it can't quite reach a body of troops with it's trample move, it will use it's "Stamp and Gore" attack.

And of course all the while the Mumak is doing it's thing, the ickle crew in the Howdah strapped to the beastie's back can fire away at the enemy below too.

WotR is designed to played with hordes of figures, it's the Lord of the Rings version of 40k's "Apocalypse". The Battle of Pelennor Fields scenario in the WotR rulebook is massive, the Evil Player having the option of fielding up to 10,000 points of models. One of the pictures in the rulebook of the scenario in play has 9! Mumakil on the table. 9 is pretty excessive even for the most committed Lord of the Rings fanboy, I can only manage


A third of the way there
Plus

One day, he shall arise from his box and crush all before him!

My mate, Alan, has also just bought himself a Mumak off EBay and I know of at least 1 other Kirriemuir club member who has another completed model So if there is anybody out there in the Angus and Dundee area of Scotland that has a few Mumakil to spare and fancies playing a Pelennor Fields re fight then let me know!!!


Thursday, 22 March 2012

Plastic Soldier Company Ltd 1/72nd scale M4A1 Sherman


So the latest 1/72nd scale release from The Plastic Soldier Company Ltd arrived at Kingsleypark Manor today - the M4A1 Sherman.

As it states on the front of the box there are enough parts to build 3 models. On the back of the box you get a couple of pictures and a helpful painting colour guide


Unfortunately, the blurb on the back of the box is mis-leading. It states


For those of you optically challenged left click to enlarge the photograph.

It states that there are parts to build the 75mm or 76mm gun variant and also has US and British Commanders. Unfortunately this is incorrect. The sprue only contains parts for the 75mm version and only 1 Commander figure is included, a British Commander. I suspect the blurb has been lifted directly from the text used for the 15mm version of the kit. And of course, the picture of the 76mm version on the box isn't relevant for what is in the box.

Inside the box are 3 of these -


And 1 of these -


As with the rear of the box, the instruction sheet is slightly misleading as it shows firstly, the turret having the narrow 75mm mantlet. No such piece appears on the sprue, it is in fact the wide mantlet variant that is supplied. Secondly, the cast iron arches at the front of the picture (anyone know what the technical term is for these?) do not appear on the sprue.

Building the kit is for the most part pretty painless. The only part that requires a wee bit of care is the track assembly.


You have to make sure that the two parts of the track have the links of the track going in the same direction. They are moulded in such a way that some of the teeth on the track are missing so they go to the back of the track when fitting it together. And the sprocket wheel has a moulded plug that if put in the correct way the teeth of the sprocket are visible as opposed to being hidden by the track.


Finished track assembly for the left hand side of the model.

A couple of dollops of glue and the bottom of the hull and tracks are complete


The upper hull and the front of the tank are added next


As mentioned above the turret provided is the 75mm version with wide mantlet.


As can be seen, I've built the turret with the commander in place. It has to be said that if you want to omit the Commander and have the hatch doors closed they are going to have to be trimmed to fit the ring of the hatch. Certainly from the dry run I had they did not fit flush, so using the Commander is the eastiest option and in any event no self resepcting British Tank Commander would skulk inside his tank just because Jerry was about!

There is a .50cal Browning machine gun and mount that can be fitted to the turret but I have left this off, so it will mean a wee bit of filler will be required to fill in the hole provided for the machine gun mount. There are also optional side skirts provided. Hull mounted machine gun was added and viola, a finished model -


Not counting the time it took to cut the parts of the sprue, I'd say it took about 10 minutes to put together.  There are a couple of extra bits that can be stuck on as spare parts for the tank, for example, there is a some track, a bogie wheel and a jerry can. There are also these -


Any clues as to what they might be?
I thought initially they might be smoke dispensers but they look they wrong shape.

And then there is this piece -


Again, not sure what it is and where it is supposed to go.
Any suggestions as to where I should stick it? (Polite answers only please)


Here is a size comparison with an Armourfast Sherman and an Airfix Sherman -


The Armourfast kit is on the left. The smaller 1/76th scale Airfix model on the right.


Price of the kit direct from The Plastic Soldier Company is £12.95 plus postage of £1.30. Ignoring the postage cost that works out at £4.32 per model. The Armourfast kits retail at £7.99 for 2 models from Wonderland Models who are based in Edinburgh (they charge £3 for postage) so just under £4 per model.  According to the Hannants online store there are numerous different manufacturers of plastic Sherman kits at many different price ranges but none working out as cheap as either the Armourfast or Plastic Soldier version. A resin kit from Under the Bed Enterprises costs £4.95.

Althought the Armourfast model works out slightly cheaper than the Plastic Soldier version and despite the misleading blurb on the box, instruction sheet  and the mystery sprue items I do prefer the Plastic Soldier version. I thought the kit was detailed enough yet simple to put together.

According to the latest news release from The Plastic Soldier Company Ltd there are more 1/72nd scale goodies to come from them over the next months so it is encouraging to see that they are continuing to expand the range, so if 1/72nd scale/ 20mm WW2 is your thing then you should certainly consider checking them out.

I'll get the model painted up over the next few days and post some pictures up in due course.


Wednesday, 7 March 2012

Plastic Soldier Company Ltd - Panzer IV 1/72nd scale


Way back in May last year I ordered the 1/72nd Scale Panzer IV kit from The Plastic Soldier Company Ltd with a the intention of reviewing it for the eager WW2 wargamers out there.


The kit duly arrived and although there are parts to build 4 different versions, I decided to build up the first model as the Ausf H version, because I think the Schurzen plates looked cool.
  
Then I suffered the "Great Hiatus" and stopped blogging and stopped building Panzer IV's.


But, now I'm back and so better than late than never as they say, here are my thoughts on the kit.


The kit allows you to build 3 models and as already mentioned the kit provides you with parts to build 4 different versions of the Panzer IV.
  
So you get 3 sets of sprues looking like this -


And a 2 sided instruction sheet


 Showing the generic parts that are used in all versions

And some colour coding help you identify which parts go with which version.

So first the tracks got built

Notice the circular mould marks on the underside of the track. Not a problem when building the "H" version because of the Schurzen skirts but might cause some displeasure to those modellers looking for nice clean parts.

Then the chassis


So far, so good, the parts fitted cleanly without too much fuss. So then the turret was built and the first of the distinct changes to reflect the version I was building, the long barrelled 75mm gun

I drilled through the muzzle - probably should have done it before I fitted the gun though
  
However, the turret also gave me my first obstacle. The turret has 2 side hatches. There are indentations moulded on each side on to which you stick the hatch doors

Ah good, thought I, the different hatches are moulded slightly differently thus making it easy to identify which hatch door fitted on which side. Yeah well, it didn't quite work out that way as on the kit I received (and presumably the same for the other kits) the moulded hatch doors didn't fit, or at least 1 did but the other didn't and I tried all the different combinations. Eventually I just had to trim away at the hatch door until it fitted snugly into the slot.

It was then I discovered this bit


Obviously some sort of storage box but no hint as to where it was to go on the model.

Then there was this bit


According to the instruction sheet it is fitted to the Ausf H

Green means "H"

But I initially couldn't see where it went. Eventually I found from checking some pics on the web that it looked to be fitted to the right hand side of the upper chassis so that's where I stuck it. And actually if you strain your eyes you can just see it on the picture of the Ausf H on the instruction sheet


A couple of options for the commander

The air bubbles in the back are easily filled in

Then on pop the Schurzen


That was as far as I got at the time so over the last few weeks I finally managed to finish the model off.


I used Vallejo's Flames of War colours for the vehicle. - Middlestone 882 for the base colour and Reflective Green 890 and Cavalry Brown 982 for the camouflage pattern, covered it in GordonY's gunk (Gordon's home made Army Painter substitute) slapped some Skytrex decals on it and then sprayed it with Anti-Shine from Army Painter


Actually, the decals have been a bit of let down. They were too fiddly to trim precisely and when I used them before they just fell off, so this time I put them on before I sprayed the vehicle with the Anti-Shine thinking that would help keep them in place but all it seems to have done is highlight the film


I then slapped the tank on a cork base - I swithered about whether or not to base it, but decided I didn't want to risk having to re-attach the Schurzen every time I picked the tank up, so went for the base to cut down on the handling of the model. Covered the base with some Brown Basetex from Coritani (and slapped some of that on the tank as well) and some static grass.


Verdict? - nice simple kit. It might lack the detail that some modellers will prefer to see on a kit but what it lacks in detail it makes up in price - £12.95 for 3 models can't be bad.

So, the 1/72nd M4A1 Shermans are now on order and I'll let you know what I think of those when they arrive and I promise not to take 10 months before getting round to it..........