Sunday 14 April 2019

Mortal Gods - First Playthrough


So my mate, Alan, has been waiting with fevered anticipation for this to arrive and so when the postie delivered Mortal Gods (originally by a company called "War Banner" but who have now had to change their name to "Dark Peak Games" and then to "Footsore Miniatures and Games" due to having received cease and desist letters from GW and Peak Games - see the announcement here) to him a couple of weeks ago he has been been busy as the proverbial painting up the core set figures. And Alan being Alan, had also got the Spartan and Athenian boxed sets as well as a number of "extra" models so he has gone pretty well all in on the game!

So when I went up to his house last week he had a couple of warbands pretty well all painted and ready to go

All set up and ready for action

Each player creates a Warband with each individual warrior, group of warriors and hero costing a number of points with 300 points being suggested for a reasonable sized game. Each Warband (or "Lochos" to give it it's proper title) is led by a "Lochagos". At least half of the warband's points must be spent on rank and file troops (called "Companions") and for every 125 points spent on the warband, the Lochos can include an additional hero.

The Athenian Lochagos - Andronikos the Defender

Different types of warrior are represented - from your skirmishing troops to your classic Hoplite Warrior and each unit will be classed as either Light, Medium or Heavy representing the armour that those warriors wore.

Each part of the warband will have a stat card showing the various attributes that you need to use throughout the game - movement, attack value, "active" defense value, resistance, courage and activations. Some units may also have "gifts" bestowed on from the Gods - special abilities that can perhaps boost movement or combat or courage.

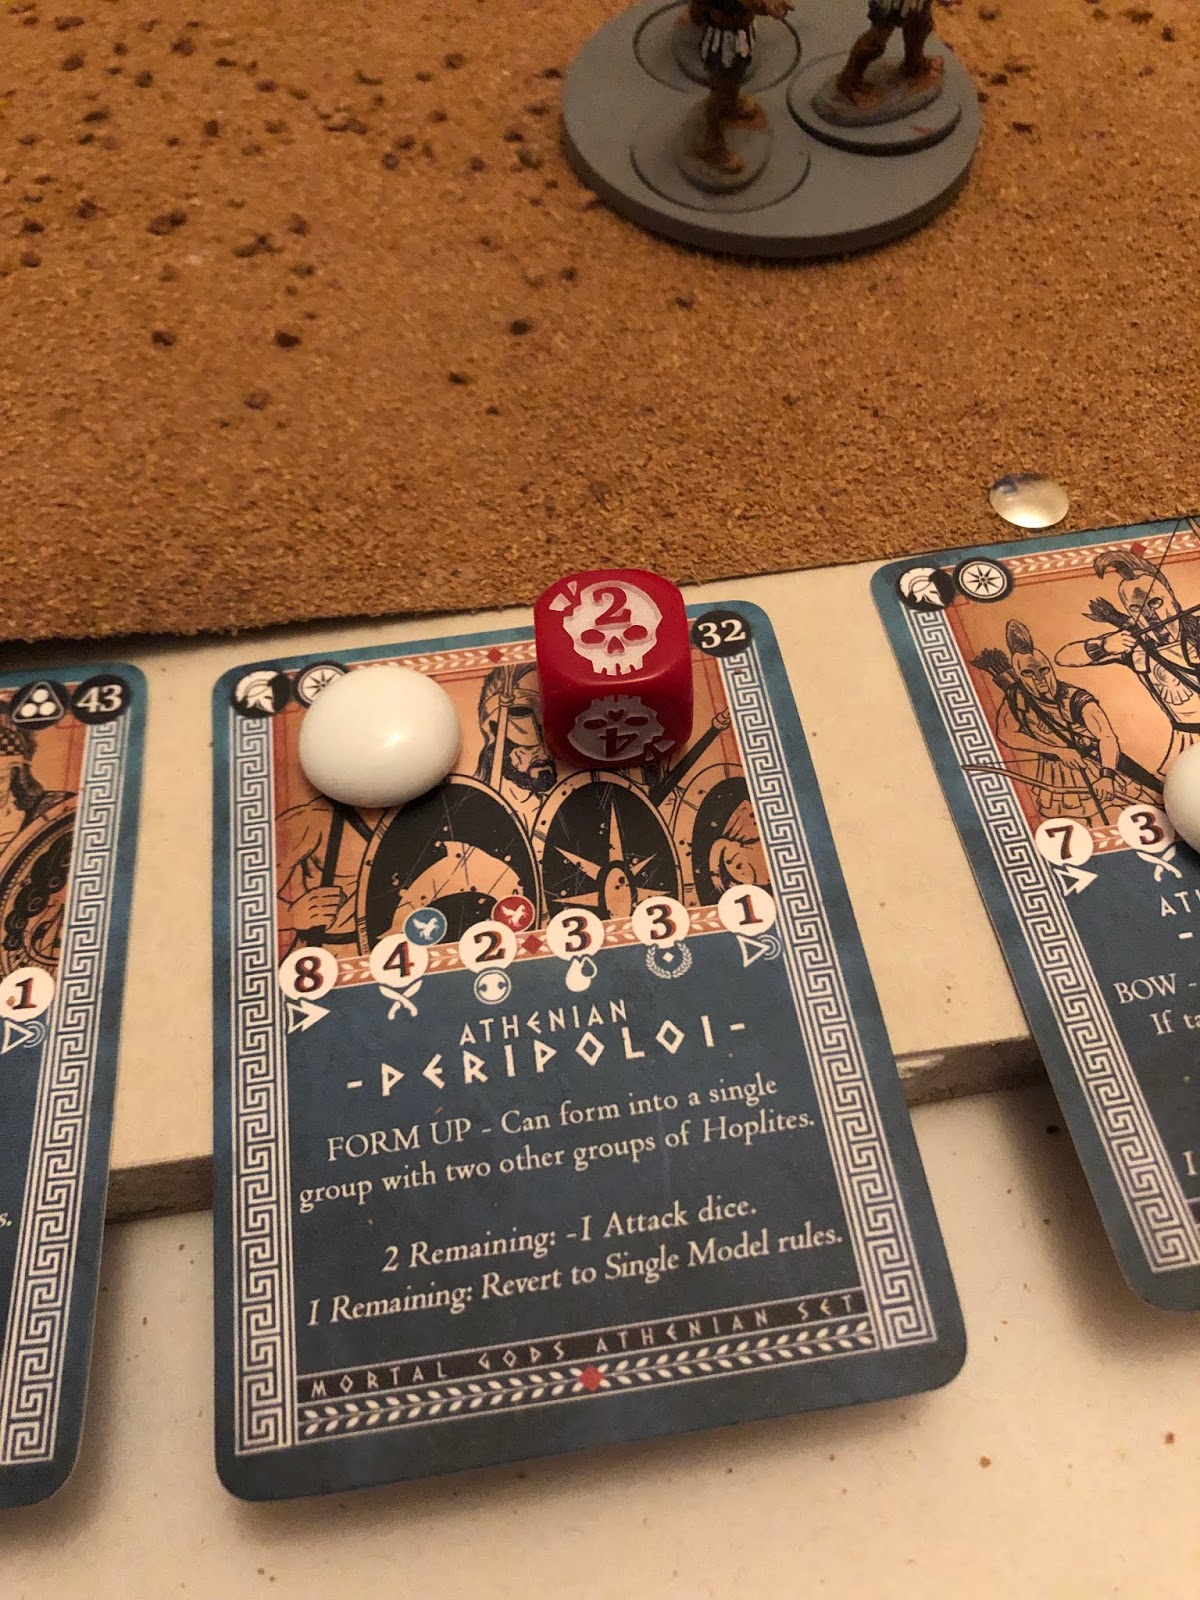
Stat Card for an Athenian "Peripoloi" unit. 

The Brave Defenders of Democracy - the Athenians

The Tyrannical Spartans 

The system is activation based. Rank and file units will normally only have 1 activation they can do per game turn with heroes having 2 or more. At the start of a game turn each unit is allocated a token per activation it can do (in the core set you get white pebbles for rank and file and black pebbles for heroes) and these are put in a draw bag and then the player draws a pebble from the bag. If it's white  pebble then they can take an action with one of their rank and file units and if it is a black pebble they can take an action with one of their heroes. In the game that we played each of heroes had a special ability whereby they could use their activation to order another of their units within 6" of them, even if that unit had already activated that turn - effectively giving the unit a "free action" - this can come in very handy!

With an activation a unit can either move (Light troops can move up to 8 inches, Medium troops up to 7 inches and Heavy troops up to 6 inches), carry out a charge attack whereby the unit can move it's normal movement plus D6 inches - beware, however, if you roll a "1" on the D6 then your unit is deemed to have "stumbled" and won't then charge! Missile troops can carry out a ranged attack. If a unit has the "form up" gift then it can join up with 2 other similar stands of figures to form a phalanx.(this didn't come up in our game so I don't know what the benefits of forming a phalanx are except to assume that it will be pretty hard in combat! - I'll investigate this in more detail the next time we play!).

Combat involves rolling some custom dice - these are emblazoned with swords, double swords, shield or a "Pegasus" symbol. When attacking, a unit rolls the number of dice as shown on their stat card plus any other bonus dice that they may qualify for through their gifts or some other event. Every sword symbol rolled counts as a success and if a Pegasus symbol is rolled then this may also count as a success if the attack stat on the card has a blue Pegasus symbol next to it. 

That's a lot of swords!!!

Before any attack dice are rolled, the defending unit will need to declare if it is "actively defending". If that unit has not yet taken an activation for the turn then it can choose to actively defend (and thus use up it's activation for the turn) thus allowing it to roll the number of defense dice shown on it's stat card. If it chooses not to actively defend - thus hoping to keep it's activation to do something else then it will need to make a courage check - the unit will roll a number of dice as shown on the Courage Stat on it's card. If it rolls a sword symbol - it passes. (I will need to check this time next time I see the rules as it didn't seem very onerous a check - that is until my Lochagos did a courage check and just managed to roll 1 sword on 4 dice!). If the check is passed then the unit will roll defense dice equivalent to it's armour rating, 2 for Heavy troops, 1 for Medium troops and none for Lights!

For every Shield symbol rolled (and if allowed by the Defense Stat - Pegasus Symbols) will cancel one of the successes. If there are still 1 or more successes remaining then the attacker will roll a number of dice equivalent to the uncancelled successes and again each sword symbol will this time score a wound on the defending unit (as marked by the red dice in the Peripoloi picture above). Once a model takes wounds equal to it's resistance value it is removed from play. If damage is scored then the defending unit will be forced to retreat 1 or 2 inches back depending on how much damage is scored. If no successes are scored then the attacking unit will retire an inch.

If a stat symbol has a "Red Pegasus" symbol next to it then that will cause a penalty to the particular unit when using that stat if a Pegasus symbol is rolled. Again note the Red Pegasus symbol next to the defence stat on the Peripoloi card.

In addition to all of the activation peebles placed in the bag are placed 3 red "Omen" pebbles. If one of these peebles is drawn then the top card is drawn from the "Omen"deck of 30 cards which is shuffled at the start of the game. This card may bring a boon or curse to the unit or it may be an event that affects one side or the other or perhaps the whole battlefield. Some may only last for that turn, others may stay in force for the rest of the game. Who knows what the Gods will bestow upon the combatants!!

When the 3rd red Omen pebble is drawn the turn ends and all of the activation pebbles returned to the bag and a new turn starts.

The game is scenario driven with a dozen suggested scenarios given in the Rules - setting out the objectives, length of the game and any other special rules. The recommended play area is a 3' x 3' table although in our game we just played down the length of Alan's table and it seemed to work out fine.
Note the cool measuring stick!

So being our first try out we just went for a simple attrition scenario - that is - kill as many of the other guys as you can and the player with the highest number of victory points scored wins!

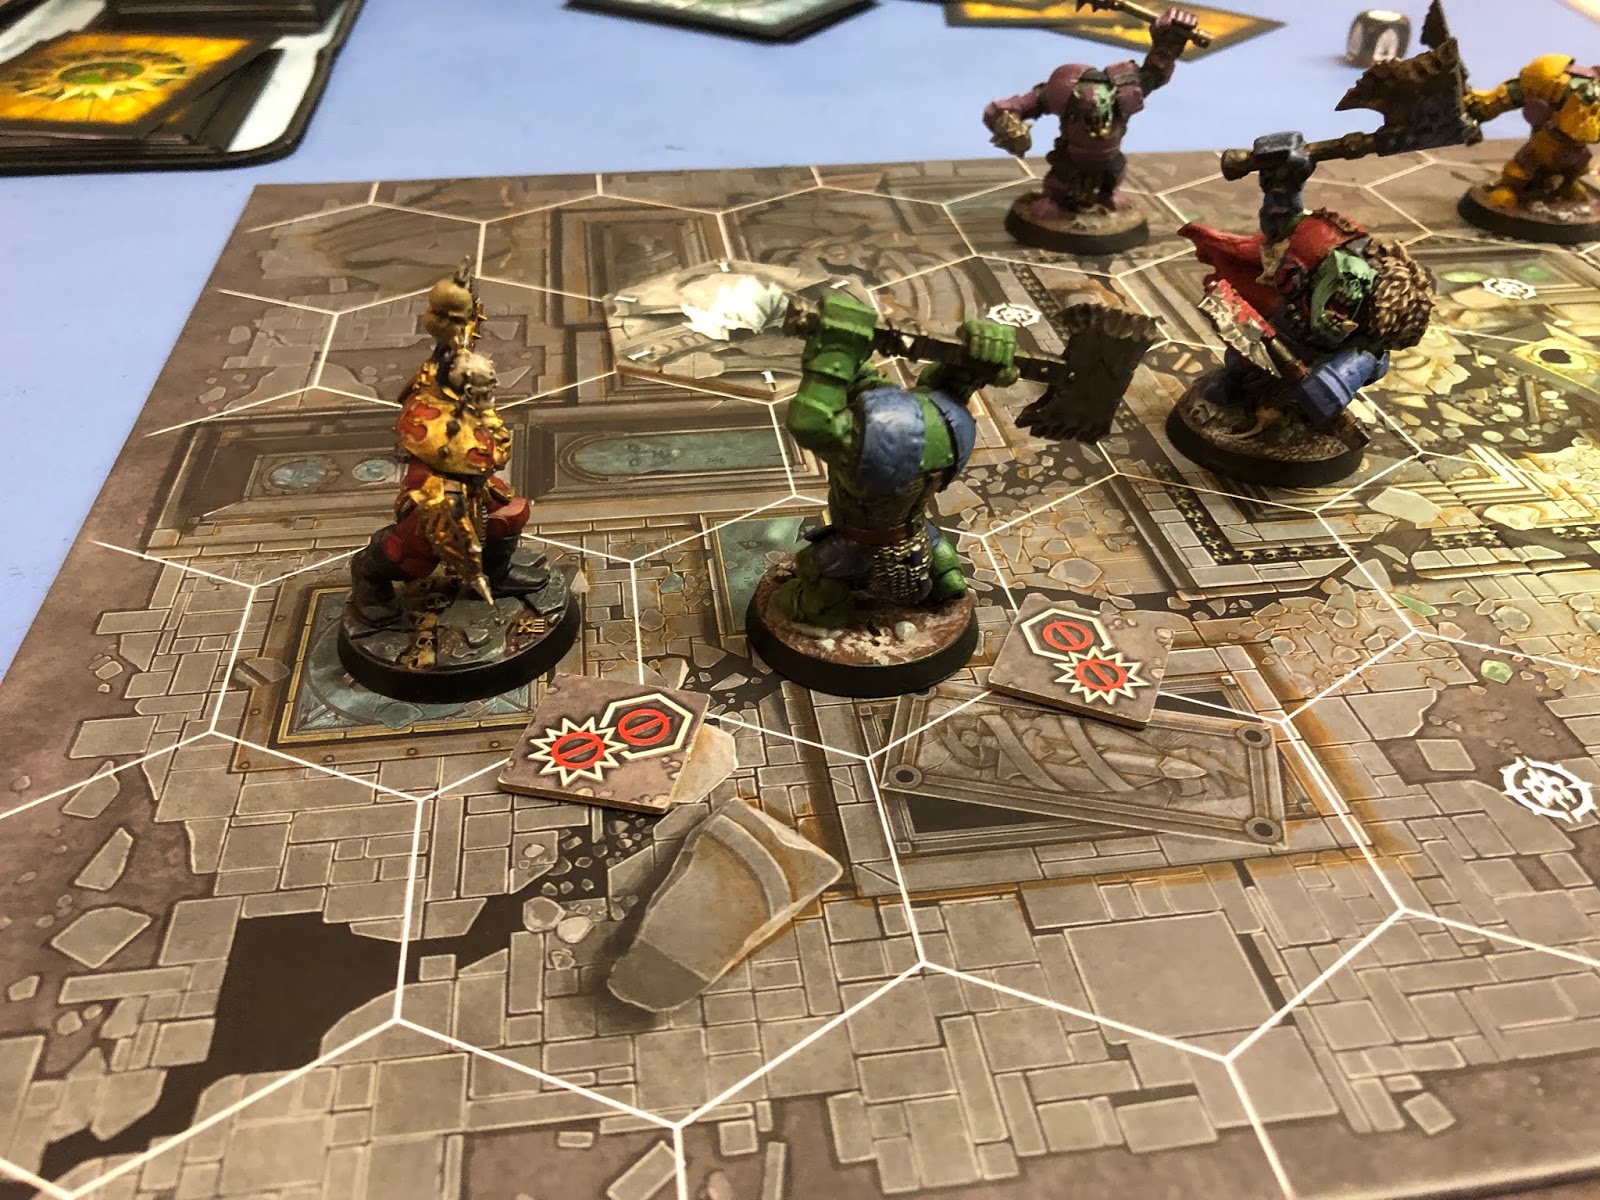
The Athenians deployed ready for battle!!

The Spartans line up nervously at the other side of the battlefield wondering where Gerard Butler has disappeared off too!!


The Spartans advance

The Athenians stride out to meet them. Unfortunately the turn ended before I could get my last 2 warriors (the 2 guys at the back) to activate.

Andronikos the Defender urges his men forward!

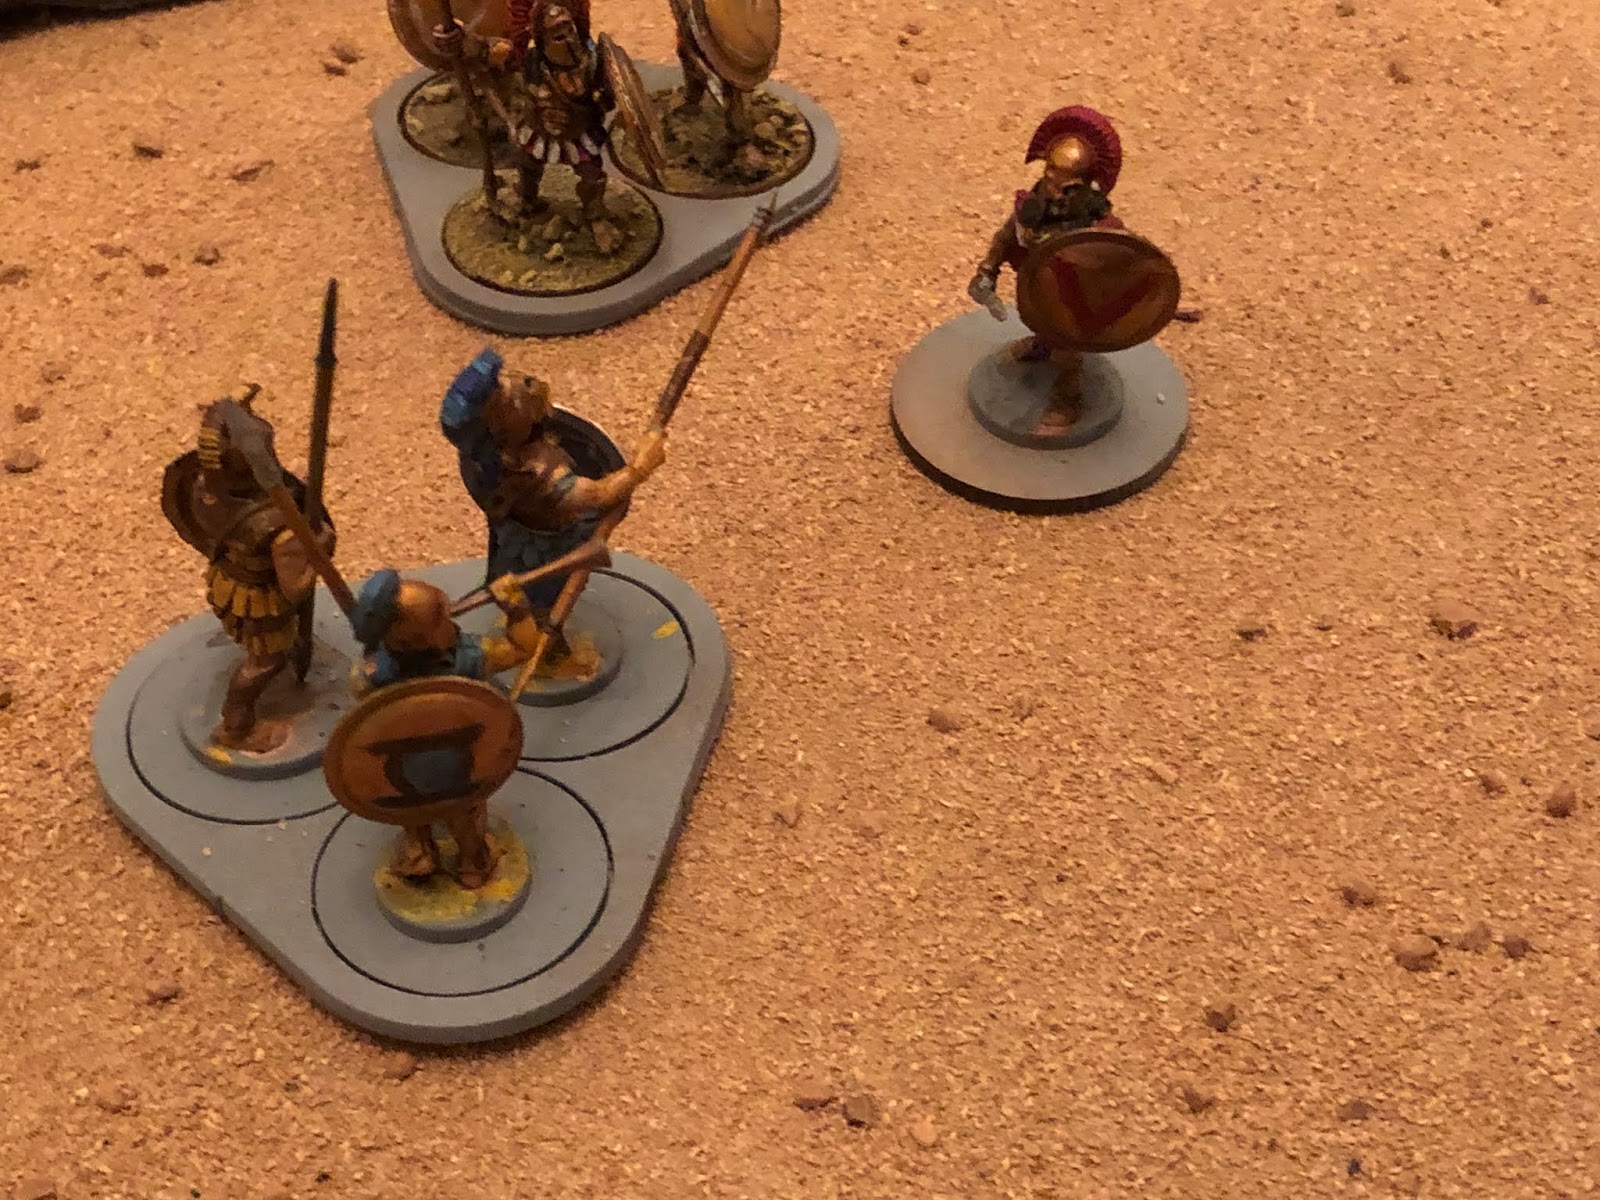
First Contact - The Athenian Marines (I can't remember what Greek name they have!) are assaulted by the Spartan Krypteia - top dogs in the Spartan Army apparently!

The Marine take some wounds but not enough to remove a model. They do a strategic withdrawal.

The Spartan Krypteia being so distracted by the Marines fail to see the danger on their flank as Andronikos charges in (no flanking rules in this game as far as I could see anyway)
As seen from the Spartan side

Having already removed one model from the Krypteia, Andronikos gets another activation and charges in scoring 8 successes!!

The Krypteia only cancel 2 of those successes so Andronikas rolls for wounds and scores 6 wounds!! Dead Spartans!!

The Athenian Archers open fire on the lone Spartan Hoplite who dies when the sky is filled with arrows.

The opposing Hoplites clash shields! 

Then the Spartan Lochagos decides, eventually, to get in on the act

And is forced to retire!!

3 units against 1?? That's hardly fair. Now the Spartan light troops get involved.


The Athenian Hoplite counter attack on the Spartan Light troops results in 2 models being removed. Another Spartan Hoplite Warrior decides he needs to help out his comrades.

The Spartan light troops - egged on by the Spartan second in Command (the Promachos) face up against the Athenian light troops.

Andronikos arrives to take some pressure off the Athenian Hoplites and crashes in to the Spartans

The Spartan Hoplites routed! The Athenian Hoplites hanging on, down to their last model (who had one wound left!)

The battlefield at the end of the final turn (turn 6).

I'll not embarrass Alan and announce the score but let's just say that the Gods were definitely smiling on the Athenians who gave their Spartan foes a damned good thrashing.

So a good fun game to begin with. Definitely a few points that we missed (critical hits being one of them) so hopefully in our next game we can tidy up on those points and if Alan keeps painting at the speed he has been doing then we might even see enough troops being available to form Phalanxes so it will be interesting to see what that brings to the battlefield.


Monday 8 April 2019

Warhammer Underworlds - The Waaaghrio Brothers Come Out to Play


Roo, in true wargamer style, has been jumping from project to project recently. Having started painting up some 28mm Fins for Bolt Action, he then started chopping up Space Marines (although not to play 40K - I'm not sure what rules system he had in mind for that). Then he started swapping out the bendy axe from a pre-painted D & D Gnoll and replaced it with a much more sturdy weapon and latterly he decided to finish painting up the figures for his Orc/ Orruk Warband for Warhammer Underworlds. For some reason he decided to paint them up using the colours of the Marios Bros so Gurzag, seen above, is in blue and red in homage to Mario himself.
Bonekutta is in the colours of Luigi

Hakka wearing yellow as does Wario

And Basha in the colors of Waluigi.

Of course, having such a fancy colour scheme is all very well but until they had been proved in battle, the Waaaghrio Bros may as well stay in the box.

So it was that they took to the table to play their first game of Warhammer Underworlds, taking on the servant of Khorne himself, Magore Redhand

Magore Redhand - ready to claim Skulls for Khorne

Zharkus The Bloodsighted

Ghartok Flayskull (don't you just love the names GW give their models?!)

Riptooth

Disclaimer - Roo did not build the decks for the Waaaghrio Bros - he just used the decks that I had previously built for my Orc/ Orruk Warband. He asked me to state this before you read any further.

So having won the roll-off for board placement, I decided to place the boards slightly offset (but still keeping 3 full hexes in no-man's land) and then having placed the objective tokens and drawn our objective and power cards, we then deployed our warbands.


However, despite having deployed my warband first I still managed to lose the roll-off to see who would take the first activation. Gurzag/Mario decided to launch himself headlong into an attack against Ghartok.
Gurzag/ Mario shouts obscenities at Ghartok.

And promptly misses. Ghartok has a reaction attack with his Gorefist but given that the way to inspire a member of the Waaaghrios is to cause them damage, I held back the attack. However, Gurzag/ Mario didn't hang about and playing "Brutal but Kunnin'" Gurzag/ Mario then ran away 3 hexes......

Ghartok is left bemused at the sight of Gurzag/ Mario making a "tactical" retreat.

However, Ghartok was not to be denied and in my first activation, declared a charge against Gurzag/ Mario with Ghartok.

Ghartok shows Gurzag/ Mario some combat skill causing 2 wounds.

As "reaction" I then played the "Twist the Knife" power card which caused an extra wound to Gurzag, so 3 wounds inflicted in total - a half dead Gurzag/ Mario. With the attack being a success  I was able to inspire Ghartok. However, taking damage also meant that Gurxag/ Mario also inspired.

Now being a friendly, non-competitive game we don't abide by the Banned and Restricted card list that GW have published for Warhammer Underworlds which you can find here (mainly due to the fact that I've never had enough time to go through my built up decks and check them for such cards). So when I played "Great Concussion" there was no gnashing of teeth from Roo or howls of "Foul Play" but I used this to push everyone away 1 hex from the designated hex primarily to avoid the possibility of Ghartok being tag teamed by one of the other Waaaghrio Bros and counting Gurzag/ Mario as support. However, it did also mean that my other warriors were just that further bit away. And as it turned it out it didn't stop Ghartok being charged in turn by Bonekutta/ Luigi and Hakka/ Wario although thankfully neither of them did any damage to Ghartok.
Bonekutta/ Luigi finding out that his axe is too heavy and promptly missing Ghartok.

Scene at end of Round 1. Ghartok is shouting for help as the Waaaghrios gang up on him.

I did manage to score a glory point with Ploymaster having played 3 ploy cards in the first round whilst Roo scored a glory point for having 3 of his models declare a charge. With my glory I upgraded Magore with "Trophy Hunter" which would give him an extra glory point if he took out an enemy fighter

The next few activations saw Riptooth and Magore both charge without any success although Riptooth's charge did result in Gurzag/ Mario being pushed back.
Not sure why Bonekutta/ Luigi and Hakka/ Wario are looking away from the action. Probably too embarrassed to watch the pathetic dice rolling display by both sides.

The end of the second round saw me score glory for Sudden Advance and Master of War so the score at this point was 3 v 1 and we entered the final round.

Magore activated first and with his attack took out Bonekutta/ Luigi scoring 3 glory points in total for having Trophy Hunter and also I had drawn Show of Strength which gave me an extra glory. In desperation Roo played Shardgale inflicting a wound on everyone and finally taking out Ghartok as a result but also killing Basha/ Waluigi.

Sensing ultimate Glory and Honour, Magore then charged Gurzag/ Mario and missed. Hakka/ Wario did decide to turn round and charged Zharkus, killing him and scoring another glory but at the end of the final round it was a sorry looking battlefield -

But with the objectives that I scored in the final round I ended up with 10 glory and Roo scored 3 in total.

So a sorry first outing for the Waaaghrios - the dice didn't really do anyone any favours and although Magore did have that one success both leaders were otherwise pretty bad at hitting anything.

Roo, of course, claimed it was because of the decks that he had to play with and that next time he will play with decks of his own creation. Now that sounds like a challenge.......!

Gratuitous shot of the 3d terrain that I made using some Azyrite Ruins and a mdf hex base


Monday 1 April 2019

"Red Alert - Space Fleet Warfare" - Rules Review and First Playthrough


I do like Space Ships.

And I have always liked games involving Space Ships.

Being more of a Trekkie than a Star Wars fan I cut my gaming teeth on the likes of Star Fleet Battles and Federation and Empire and also Star Trek: Starship Tactical Combat Simulator

I had Battlefleet Gothic and for miniatures I played Full Thrust and Space Dreadnought 3000 and despite what I said at the end of my blog post here I did end up investing quite heavily in X-Wing (unlike the Dungeons and Dragons Attack Wing which is what I had thought I would end up doing).

I am also a fan of the Commands & Colors series of games with Ancients and Napoleonics sitting on the shelves and the app versions of The Great War  and Battlelore for my iPad and Memoir '44 on my laptop.

So when PSC Games (the board game side of The Plastic Soldier Company Ltd) announced last year that they were to do a Kickstarter to produce a Starship game by Richard Borg based on the Commands & Colors mechanics and called Red Alert then it was a bit of a no-brainer as far as I was concerned.

And give PSC their due. When the Kickstarter finished, they were estimating delivery of the game for March 2019 and as announced in my post here the game duly arrived on time.

If you have played any of the Command & Colors games then the mechanics of Red Alert will be familiar to you. The scenario will determine which player will go first and the game is an IGO-UGO system.

Each player has a hand of "Command Cards" with which to order their units. The board is split in to 3 sectors, left, centre and right. One card is played each turn and this will determine which sector of the board will be activated or which category of unit is activated with the maximum number of units that can be activated either stated on the card or limited by the players "Command Rating". 

The units in this game are split into 3 classes, Capital, Strike and Fighter with each class also sub-divided into standard or heavy units (with 3 models representing a standard unit and 4 units representing a heavy unit). Any units activated can move up to a set number of hexes for the particular type of ship, for example, fighters will normally move up to 4 hexes whereas your flagship will only move 1 hex. Terrain can play a part in the game in the form of Asteroid fields and Planets,  slowing a unit's movement and in the case of an Asteroid Field possibly causing damage to the unit.

Activated units once moved can then engage in combat, either ranged or close quarters, although it should be noted that a unit does not need to move to engage in combat. The unit simply has to be activated that turn.

Also available to the players is a deck of "Combat Cards" which can be played during combat to gain a tactical advantage. However, the play of these cards cost a number of "Star Tokens". At the start of each scenario the player will have a specified number of these tokens which are depleted as the combat cards are played. To replenish these tokens the player has the option of taking 1 or 2 tokens at the end of their turn (if the player wishes to draw a new combat card at the end of their turn then they only draw 1 token or they can forfeit the drawing of a combat card and draw 2 tokens instead). Also, during a combat roll the player will receive a star token for every star symbol rolled on the dice.

When units enter into a combat (ranged or close quarters) the attacking player will roll the designated number of dice for the attacking unit and for every class symbol of the defending unit type rolled (purple squares for Capital, Blue triangle for Strike and Green circle for Fighter) or if a Blast symbol is rolled then a model from the defending unit is removed. However, heavier ships will be able to ignore some hits inflicted by smaller classes, for example, Capital ships ignore the first two blasts symbols rolled by an attacking Fighter unit and Fighters will ignore the first blast symbol rolled against it by an attacking Capital ship.

Once all the models in a unit are removed then the victor will receive that unit's counter which will be worth a number victory points and the winning of the scenario are determined either by the number of victory points accrued or enemy units destroyed.

If the attacking player rolls a "Red Alert" symbol on the dice then, similar to the "Flag" symbol in Ancients, the defending unit may have to retire 2 hexes. If a hit is rolled in the same roll then the unit must retire (unless it is adjacent to it's Flagship unit). If no hit is rolled then the unit can choose whether to retire. If 2 Red Alerts are rolled then the defending unit will have to retire. Units can retire through hexes occupied by enemy units (it is space after all) but at the risk of taking more damage from a free roll for the enemy unit. A Red Alert token is placed with the unit and whilst it remains with the unit it cannot move forward and if it engages with an enemy unit it loses an attack dice. Star tokens require to be spent to remove such a token.

If the defending unit doesn't retire then, if it is a close quarters combat and if the player has 2 star tokens available, then they can "battle back" and roll to try and score hits on the attacking unit and again if star tokens available may play a combat card to support that combat.

There are 10 scenarios provided in the core game and other scenarios are provided in the "Escalation Packs" that are available separately. These scenarios will either list the ships available to a Player or the Players may require to draw a random "Task Force" card which will determine the ships available to them.

And so it was the day after the unboxing, Roo and I set up the first scenario "Uneasy Truce" with Roo taking command of the Rebel Confederation fleet and I took the helm of the lawful rulers of the Galaxy, the Commonwealth.

The upholders of law and order in the Galaxy, the Commonwealth Fleet.

Looking to overthrow the oppressive yoke of tyranny, the Confederation fleet.


The Counter in the hex is the unit counter which contains all the info you need about the unit, it's class, movement, range and number of attack dice to roll. 

To win the scenario, a player had to obtain 13 victory points. Roo took the first turn and immediately went on the offensive by playing "Move, Combat, Move"

On the Confederation left flank, the two Confederation fighter squadrons gang up on the Commonwealth fighters.
And the fighters engage on the Confederation right flank.

First Roll of the game......

A Blast Symbol, a Red Alert and a miss on the fighters. One fighter model removed and the Red Alert forces a retreat.


On my turn I play the outflanked card and moved my big ships to swat the annoying Confederation fighters out of space.


Commonwealth Left Flank - the Cruisers open fire on the marauding Confederation Fighters

And on the right flank some damage is scored.

Roo then ordered an advance across all sectors -


And played a sneaky Combat Card to remove all but 1 of my Combat Cards from my hand -

Note  in the top left of the card, the 2 "Star token" cost to play this card.

Confederation Battleships with their Destroyer Escort move into range of the Commonwealth forces.


Confederation Fighters fire once more in their Commonwealth counterparts. Ouch! Scratch one Fighter Squadron
The Red Alert token - all that is left of the Commonwealth Fighters.


After 3 turns, the fighter squadrons of each fleet had taken a bit of a pummeling but the Commonwealth have also lost a Cruiser Squadron.

The opposing Battleship squadrons look to get Space dominance over the other but in the ensuing salvoes, accurate Commonwealth fire reduced the Confederation heavies to space dust (that was one thing we did forget about - when a capital ship squadron is destroyed it is replaced by a space debris token which makes that hex impassable terrain).

The Confederation have total control over their Left sector but are heavily outnumbered in the Centre and Right Sectors.

The Commonwealth Flagship senses victory - if that Confederate Cruiser squadron can be taken out it would give the Commonwealth enough victory points for the win.

14 Victory points to the Commonwealth. Victory is theirs!!

The game only took about an hour to play which wasn't too bad for our first attempt so we quickly set up the mat for the second scenario "Declaration of War"


The sneaky Confederation using the cover of the Planet to protect their fleet.

Once again Roo, went first. This time the winner would be the first to 18 victory points or by destroying 8 enemy units.

Roo sent his fighters in to harass the Commonwealth forces -


The battered Commonwealth fighter squadron sent packing to the rear. Worse, however, was to come -
The Confederation fighters swoop on to the Commonwealth Cruisers.
3 hits! One Cruiser squadron vapourised!.

On the Commonwealth Left Sector the Destroyers move to engage.

Then the Commonwealth Fighters get their own opportunity to do a hit and run on the Confederation and claim some badly needed Start Tokens.


On the Confederation Left Sector, the battleship squadron senses an easy kill on the fighter squadrons. However, this took them within striking Range of one of the Commonwealth battleship squadrons and by playing the "Echelon Right" Command Card, the battleships moved in to position and opened fire.


The Confederation Battleship squadron is no more - 6 victory points to the Commonwealth.

I started to sense that the battle was starting to swing my way. I had a good set of Command and Combat cards in my hand and when I played Counter-Attack


My Destroyer Squadron moved into point blank range of the Confederation Battleships. A Combat Card gave them an extra combat dice and they opened fire.


2 hits scored and if it hadn't been for the fact that the Battleship can ignore 1 blast symbol where the attacking ship is a Strike class unit (as was the case with the Destroyer unit) it would have been another Confederation Battleship squadron destroyed.

The damaged Confederation Battleship squadron skulks in the rear whilst the Commonwealth Battleships move up to challenge control of the Planet 

The Confederation forces greatly reduced seek cover once again behind the planet

By this stage of the game, both sets of Fighters had been taken out of action with only those fighters that provided CAP support for the Flagship remaining.

By now, the Commonwealth Battleships had revealed their new secret weapon

The Cloaking Device (obtained by play of a Combat Card) reduces the number of attack dice the enemy can roll against the unit to 1, regardless of range.
  
The Confederation Battleship squadron returns to the line and in their salvo score another hit on the Commonwealth battleships. 

However, in my turn, I am able to activate my Battleship Squadron and opening fire on the battleship squadron- 

Two hits destroys the Confederation battleship squadron and with it gave me the 18 victory points required for victory.

So an enjoyable night's gaming with a new game but one familiar to us both having played Commands and Colors before. 

The play of the Command Cards are key to the game - if you don't have the right cards in hand then this can really thwart your plans. I have read some reviews of Commands and Colors games where this is regarded as a weakness of the game system, but I would regard it more akin to "friction" in the game (a'la Too Fat Lardies design philosophy) in that you are not always able to do everything that you would want to do in a turn.

The Combat Cards add unexpected twists and flavour to the play and can help get crucial extra dice into a combat. The Combat procedures is itself simple to pick up and effective (and sometimes brutal as shown in the case of my cruiser squadron who were blown apart in one die roll) Again, some people have said about Commands and Colors Ancient, (where the combat system is similar) that the fact that a unit does not lose attack strength despite the casualties taken is not realistic (as far as there can be any realism in such games). I, personally, haven't got a problem with it.The number of models left in the unit is certainly a helpful reminder as to it's status and by maintaining the same attack dice regardless of whether there is 3 models or 1 model in the unit it is an easy way to remember how many dice to roll.

Although we missed a couple of things (Capital Ship Debris being one of them) and not pursing with Destroyers squadrons (this would have required star tokens and for the destroyer to have just engaged in a close quarters combat), I think we both picked up the rules pretty quickly.

There was one combat card which made us stop and think about it's meaning - "First Strike" which allowed the Defender to strike first in a combat. It wasn't clear from the card if this would have required to spend Star Tokens to carry out, as it's effectively a "battle back" but where the defender has preempted the strike and struck first. We treated the card to mean that it did require the defender to have star tokens (2) to be able strike first but other than that the cards were pretty clear and unambiguous.

The models, as mentioned in my previous post, are functional enough. I am debating whether to paint them as they look as of they will take paint well enough. With the Kickstarter came some extras of the Core Set ships so I might experiment with some of those. Some of the models are slightly out of line but nothing a dip in to hot water wouldn't sort out.

So yes, very pleased with the game and I'm pretty sure that Roo and I will be playing the next scenario pretty soon.


.